Your Cart is Empty
A Guide to Studio Monitor Stands


If you're serious about your audio, a proper set of studio monitor stands isn't just a nice accessory; it's an absolutely fundamental piece of kit. Think of them as the foundation for your sound, designed to get your speakers away from your desk and position them perfectly for the most accurate listening experience possible. Without them, you're simply not hearing the real picture.
Why Your Studio Monitors Need Proper Stands
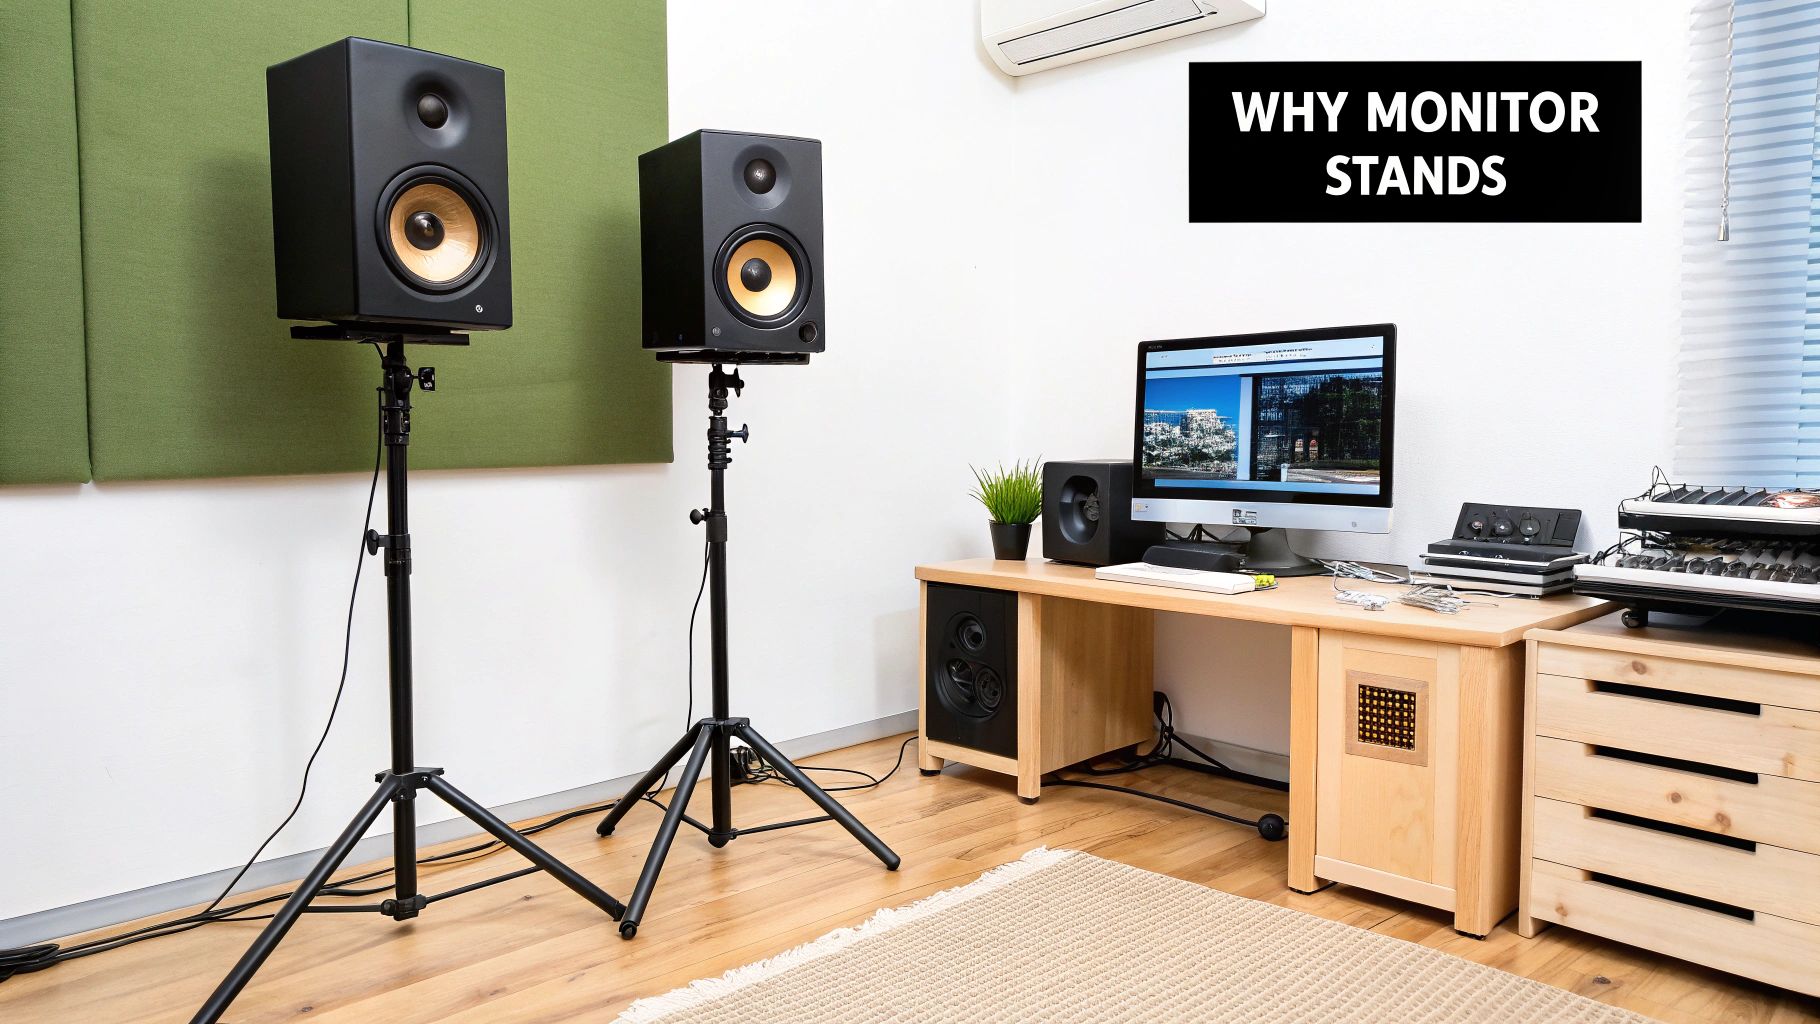
Let's be real for a moment. Plonking your shiny new studio monitors directly onto your desk is one of the most common—and damaging—mistakes you can make in the studio. It’s like buying a high-end camera and trying to shoot a long-exposure photo while holding it in your hands. The shot is going to be blurry and lack any real detail. To get a sharp, accurate image, you need a solid tripod.
Studio monitor stands are the tripods of the audio world. They provide a stable, isolated platform that lets your speakers do their job properly. Without that solid base, you're not just missing out on performance; you're actively introducing problems that will trick your ears and lead to bad mixing decisions.
Achieving Acoustic Isolation
When you place a speaker on a solid surface like a desk, its vibrations travel straight through, turning your entire desk into a giant, unintentional speaker cabinet. This creates a messy, boomy low-end and smears all the critical mid-range frequencies, completely hiding the details you need to hear.
Key Takeaway: Acoustic isolation, or 'decoupling', is all about separating your monitors from the surface they're on. Good stands achieve this by using dense, non-resonant materials and minimising the contact points, which stops those vibrations dead in their tracks.
The result? The sound you hear is coming purely from your speakers, not from a resonating desk. The improvement in bass clarity and overall focus is something you'll notice immediately.
The Importance of Tweeter Height
Another crucial job for a monitor stand is getting your speaker placement just right. High frequencies are incredibly directional; they fire in a straight line from the tweeter to your ears. If your tweeters are aimed too low or too high, you'll lose a huge amount of high-frequency detail, and your stereo image will completely fall apart.
The golden rule is pretty simple:
- Align the Tweeters with Your Ears: Your speaker's tweeters should be at the exact same height as your ears when you're sitting in your mixing chair.
- Create an Equilateral Triangle: The distance between your two monitors should be the same as the distance from each monitor to your head, forming a perfect triangle.
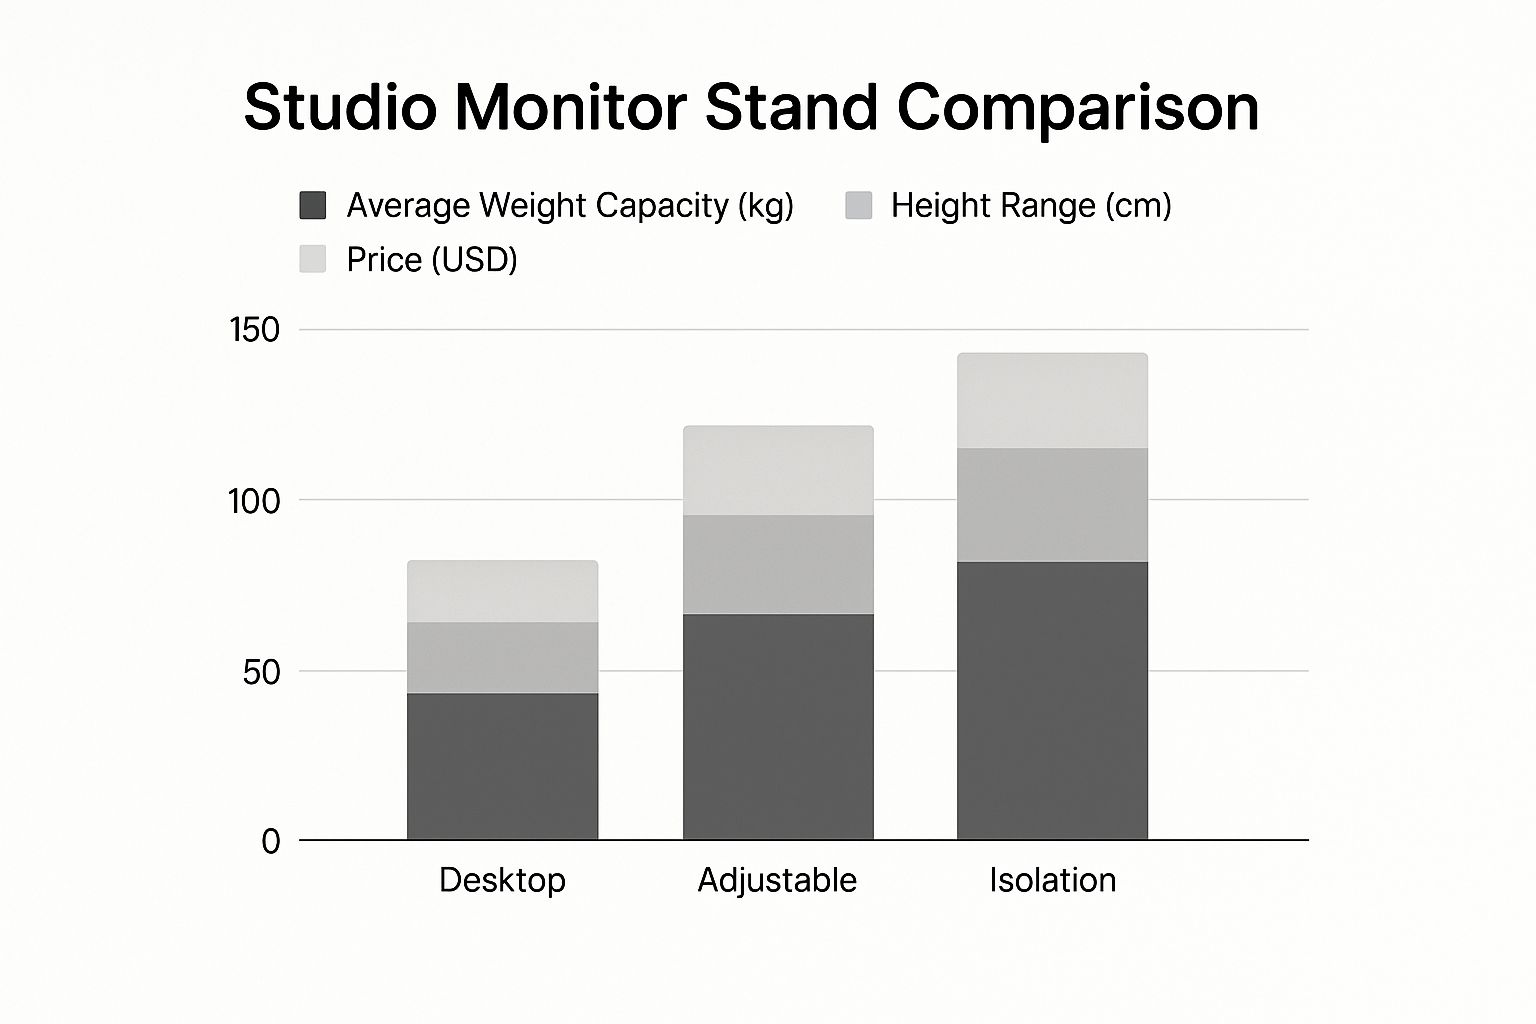
Trying to nail this setup without adjustable stands is next to impossible. They're not a luxury—they're an essential tool for creating an accurate monitoring environment. This commitment to quality is a big reason why the professional audio market is booming. Globally, the studio monitors market was valued at USD 43.8 billion in 2023, and it's only expected to grow. Australian audio professionals are a huge part of this, investing in precision gear to get world-class results. You can explore the full market analysis on Cognitive Market Research to dive deeper into these industry trends.
Choosing the Right Materials and Design
When it comes to your studio monitor stands, what they're made of and how they're built are much more than just a matter of looks. These factors are absolutely fundamental to controlling vibrations and keeping your speakers stable. The material itself directly impacts how well the stand can isolate your monitors, which is the key to getting a cleaner, more accurate sound.
Let's break down why this is so critical.
What’s in a Material?
Heavy-duty steel is a go-to choice, and for good reason. Its sheer weight and density are brilliant at dampening vibrations. Think of it as an anchor for your monitors; it stops the stand from resonating and adding its own colour to the sound. This is especially crucial for hearing tight, defined bass in your mix.
On the other hand, you've got wooden stands. While they're usually less dense than steel, high-quality wood still offers great stability and has its own unique resonance characteristics. A lot of producers love the classic look of wood, which can give a studio a warmer, more organic vibe without a massive sacrifice in performance.
Lately, we've seen some cool innovations coming out of Australia’s growing audio scene. Local manufacturers are creating specialised, adjustable stands using materials like thick aluminium for the speaker platforms. This focus on vibration-isolating materials shows a real commitment to upping audio quality and optimising acoustic performance right here at home.
The materials used in monitor stands each bring something different to the table. Here's a quick comparison to help you figure out what might work best for your setup.
Studio Monitor Stand Material Comparison
| Material | Primary Benefit | Best For | Considerations |
|---|---|---|---|
| Steel | High mass, excellent vibration damping | Serious home and professional studios needing maximum stability and sonic isolation. | Can be heavy and more expensive. Hollow designs may need filling for best results. |
| Wood | Aesthetic appeal, good stability | Studios where visual style is important alongside solid acoustic performance. | Less dense than steel, so may not isolate as effectively with very heavy monitors. |
| Aluminium | Lightweight yet strong, good resonance control | Portable setups or studios where stands may be moved frequently. | Often more expensive than steel; may not offer the same level of mass-loading. |
| MDF/Particleboard | Low cost, lightweight | Budget-conscious beginners or for very lightweight desktop monitors. | Prone to resonating and vibrating; not ideal for critical listening or heavy speakers. |
Ultimately, the goal is to find a material that provides a rock-solid, non-resonant base for your specific speakers.
Key Design Considerations
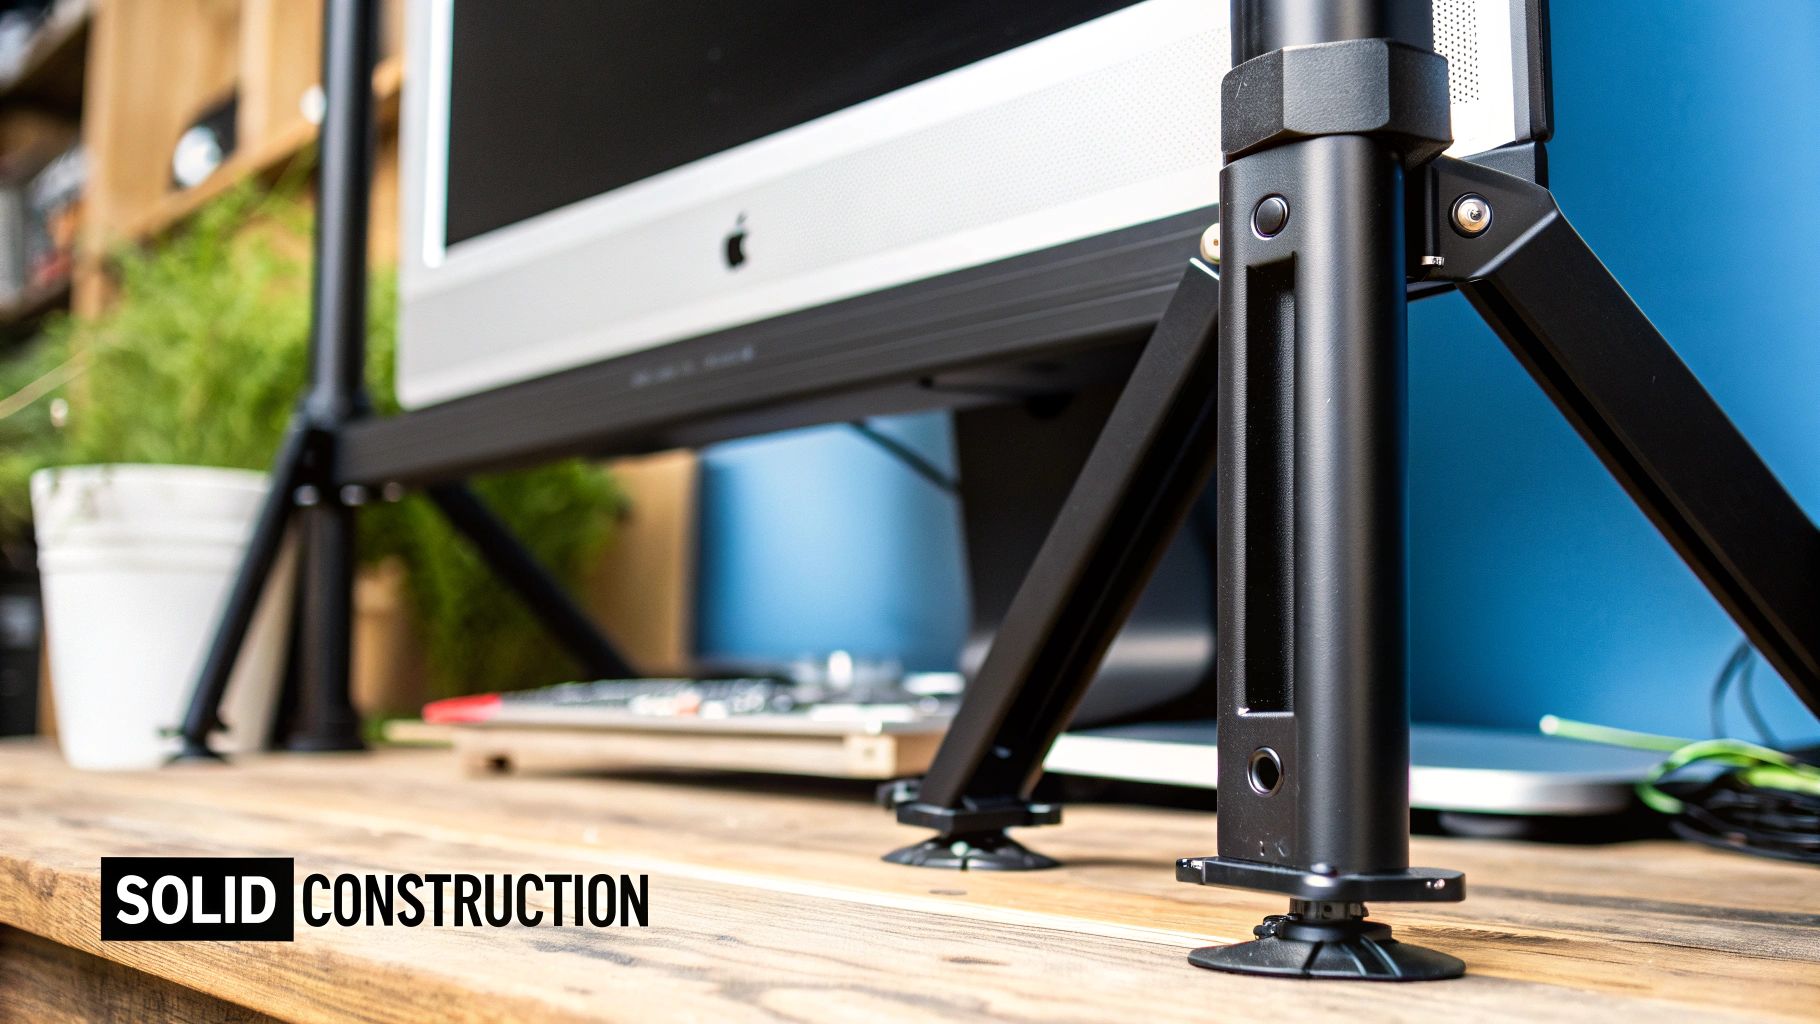
Beyond the raw material, the physical design of the stand plays a huge part in how well it works. The base, in particular, is critical for stability.
- Pedestal Bases: These are usually flat and heavy, giving you a large, solid footprint. They’re fantastic for preventing any wobbling on even floors.
- Tripod Bases: With a three-point contact system, tripod designs are often more stable on slightly uneven surfaces and can be a bit easier to slot into tight corners.
Pro Tip: Have you ever noticed that many high-end metal stands have hollow columns? That’s not a manufacturing shortcut; it's a feature. You can fill these columns with dry sand or even cat litter to add a serious amount of mass. This makes the stand incredibly stable and sonically "dead"—which is exactly what you want for perfect vibration control.
Picking the right design really boils down to your studio space and how heavy your monitors are. Heavier speakers will always sound their best on a more substantial, mass-loaded stand. For more tips on getting your room set up just right, check out our guide on essential studio setup tips.
Key Features That Unlock Better Sound
When you start shopping around, you’ll quickly realise that not all monitor stands are built the same. The real difference between a wobbly prop and a serious piece of studio gear comes down to a few critical features. These aren’t just nice-to-haves; they’re fundamental design choices that directly impact your monitoring accuracy.
Knowing what to look for helps you move past the price tag and focus on what will actually improve your sound. Some features are non-negotiable for any setup, while others offer that extra bit of finesse that can make all the difference in a pro environment. Let's break down what really matters.
Must-Have Adjustability Features
If there's one feature that's an absolute deal-breaker, it's height adjustability. You need this. The whole point is to line up your monitor's tweeters perfectly with your ears to create a razor-sharp stereo image. Get this wrong, and you'll immediately lose high-frequency detail, leaving your soundstage feeling blurry and undefined.
A less common but incredibly useful feature is tilt adjustment. This lets you angle your monitors up or down just a few degrees.
Think of tilt functionality as a secret weapon for dialling in your sweet spot. It's a lifesaver in acoustically tricky rooms or if your desk isn't at a standard height. This extra control lets you aim the sound precisely where it needs to be, making up for a less-than-perfect room layout.
With this level of control, you can ensure you’re always sitting in the sonic bullseye, no matter your setup.
Critical Isolation Components
Next up is isolation—or as engineers call it, "decoupling." The idea is to acoustically separate your speaker from the stand, and the stand from the floor. This stops rogue vibrations from travelling through solid surfaces and muddying up your mix. Good stands tackle this with a few key components:
- Isolation Pads: Usually made from high-density foam or a specialised rubber, these sit on the stand's top plate, right under your monitor. They act like a shock absorber, soaking up vibrations from the speaker cabinet before they have a chance to transfer into the stand.
- Rubber Feet: If you've got hard floors like concrete or timber, rubber feet are a must. They give the stand a stable, non-slip base while creating another barrier to stop vibrations from resonating through the floor.
- Carpet Spikes: Working in a carpeted room? Spikes are your best friend. They cut right through the carpet and underlay to make solid contact with the subfloor. This creates an unbelievably stable foundation and effectively drains energy away from the stand, killing any wobble that could smear the fine details in your audio.
By choosing stands with solid adjustability and proper isolation, you’re not just buying a piece of furniture—you’re investing in the tools you need to hear your mixes with total clarity.
Perfecting Your Monitor Placement and Setup
Having a great pair of studio monitor stands is only half the battle; the real magic happens when you nail the placement. A proper setup is what transforms your space from a casual listening room into a critical monitoring environment where you can make mixing decisions with genuine confidence. The whole point is to create a precise "sweet spot" where you hear the most accurate, untainted version of your audio.
This is achieved using a time-tested principle known as the equilateral triangle. It’s a simple but powerful concept. Picture a triangle with three perfectly equal sides: your head forms one point, while your two studio monitors form the other two. This symmetrical layout ensures that the sound from both the left and right speakers reaches your ears at exactly the same time, giving you a perfectly balanced and coherent stereo image.
Creating the Equilateral Triangle
Don’t worry, this is simpler than it sounds. All you really need is a tape measure and a little bit of patience to get the distances spot-on.
-
Measure the Distance Between Monitors: First things first, get your monitors on their stands. The distance between the centre of the left speaker cone and the centre of the right speaker cone is your starting measurement. Let’s say this comes out to 1.5 metres.
-
Match the Distance to Your Listening Position: Now, the distance from the centre of that left monitor to your head should also be 1.5 metres. You guessed it—the distance from the right monitor's centre to your head must also be 1.5 metres.
And that's it. You've just created the perfect equilateral triangle. When you sit in this position, you are officially in the sweet spot.
Key Insight: Symmetry is everything. Seriously. The left and right sides of your setup should be a mirror image of each other. This includes how far you are from the side walls and where you place any acoustic treatment. An asymmetrical room can completely skew your stereo perception, tricking you into making the wrong panning and balance choices in your mix.
Avoiding Common Placement Mistakes
Once your triangle is dialled in, a few final checks are needed to dodge some common acoustic pitfalls that can completely undo all your hard work. These issues usually stem from how your monitors interact with the room itself—especially the walls.
A classic mistake is pushing your monitors right up against the wall behind them. This is a surefire recipe for an exaggerated, boomy bass response. Low frequencies love to build up in corners and against flat surfaces, which gives you a totally inaccurate picture of your low end. You’ll find yourself cutting bass in your mix to compensate for what you're hearing, only to find your track sounds thin and weak on every other system.
- The Wall Rule: As a general guideline, position your studio monitor stands so your speakers are at least 30-60 cm away from the rear wall. This gives those bass frequencies some room to breathe and stops that nasty, unwanted build-up. For a deeper dive into room acoustics, you can check out our guide on essential studio setup tips.
By combining the equilateral triangle principle with some mindful room placement, your studio monitor stands can finally deliver the sonic accuracy they were designed for.
Why Demand for Quality Stands Is Growing
It’s impossible to ignore: studio monitor stands are getting a lot more attention these days. This isn’t just a passing fad; it’s a direct result of a massive shift in how we create music, podcasts, and all sorts of content.
The explosion of home studios has completely changed the game. What was once confined to expensive, professional recording facilities is now happening in bedrooms and home offices all across Australia. This democratisation of production means the bar for quality has been raised for everyone.
The Home Studio Boom
Modern creators know that great sound isn't just a bonus—it's essential. This realisation has triggered a huge demand for gear that delivers clarity and precision, extending beyond just mics and interfaces to the very foundation of a solid setup: the stands.
This industry-wide push for better audio is reflected in the numbers. The global market for monitor stands hit around USD 3.3 billion in 2023 and is only expected to grow. A big part of that is happening right here in the Asia Pacific region, thanks to the boom in independent creators and remote work.
Choosing quality stands is no longer just a personal upgrade. It’s about bringing your workspace up to professional standards, making sure your audio can compete, no matter where you hit 'record'.
More Than Just an Accessory
At the end of the day, this growing demand points to a deeper understanding within the creative community. We're all starting to realise that awesome sound isn't just about the speakers, but how they’re positioned and supported.
Proper studio monitor stands are finally being seen for what they are: a critical tool for unlocking true audio accuracy. Investing in a solid pair of stands is really an investment in your final mix. It ensures every decision you make is based on the clearest, most honest sound possible.
To get your own space dialled in, check out our guide on essential studio setup tips.
Monitor Stand FAQs
Even with all the benefits laid out, you might still be mulling over a few questions. That's completely normal. Getting your monitoring just right is all about nailing the small, but critical, details.
Let's tackle some of the most common questions that producers, engineers, and home studio buffs run into when sorting out their studio monitor stands. The idea here is to give you direct, no-nonsense answers so you can solve any lingering issues and get on with making music.
Can I Just Use My Desk or Some Foam Blocks?
This is probably the number one question we hear, and it’s an easy shortcut to be tempted by. But plonking your monitors directly on your desk is a massive sonic compromise. Your desk will actually start to vibrate along with your speakers—a phenomenon called sympathetic resonance. This effectively turns your whole workspace into a big, uncontrolled subwoofer, which will smear your mid-range clarity and make your bass a muddy mess.
Foam pads are definitely a step in the right direction because they help with acoustic isolation. The problem is, they don't solve the other two crucial parts of the puzzle: stability and height. They just can't offer the solid, wobble-free foundation of a proper stand, and they don't let you dial in the precise height needed to align the tweeters with your ears.
To put it simply, dedicated studio monitor stands are purpose-built to fix all three problems at once. They give you a heavy, stable base, they decouple the speaker from the desk to keep your sound clean, and they provide the height adjustment you absolutely need for an accurate stereo image.
How Do I Find the Right Height for My Stands?
Getting the height right isn't about hitting a magic number; it's all about the relationship between your speakers and where you sit. The golden rule is simple: line up the tweeters—those little drivers that handle the high frequencies—so they're pointing directly at your ears.
Think of high frequencies like tiny laser beams. They're incredibly directional. If they're aimed over your head or down at your chest, you'll lose a huge amount of detail and sparkle, making it impossible to make accurate mixing decisions.
Here's how to nail it every time:
- Get comfortable in your main mixing chair, just as you would during a session.
- Grab a tape measure (or a friend) and figure out the exact height from the floor to your ear level.
- Adjust your studio monitor stands until the centre of each tweeter is at that precise height.
That's it. This one simple adjustment ensures you're hearing the most direct, uncoloured sound your monitors can produce, which is the whole point of a critical listening setup.
What Should I Fill My Hollow Stands With and Why?
If you've noticed that many quality metal stands have hollow columns, that's not a cost-cutting measure—it's a feature waiting to be used. Filling those columns adds a serious amount of mass, which massively improves stability and their ability to absorb vibrations. A heavier, denser stand is far less likely to resonate or wobble, which translates directly to a tighter, more focused bass response from your speakers.
The end goal is to make the stand as sonically "dead" as possible, locking your monitors firmly in space.
When it comes to filling them, you want materials that are dense and don't resonate. The top choices are:
- Dry Sand: The classic choice, and for good reason. It’s incredibly dense and packs down tightly, leaving almost no air gaps. Just make absolutely sure it's bone dry before you pour it in, otherwise you risk rust forming inside the stand over time.
- Cat Litter: Believe it or not, this is a brilliant, cleaner alternative to sand. It’s also very dense and pours easily, making it a simple and mess-free way to add that crucial mass.
When you're filling them up, use a funnel to avoid making a mess. Every so often, give the sides of the stand a few good taps to help the material settle and pack in as tightly as possible. Do this right, and you'll transform your stands from simple supports into high-performance acoustic tools.
At Sounds Easy, we know that a solid foundation is everything when it comes to great sound. Take a look at our curated selection of professional studio monitor stands to find the perfect match for your speakers and finally unlock the true potential of your mixes. Find your ideal solution and order online today at https://soundseasy.com.au.
Leave a comment
Comments will be approved before showing up.
PayPal Pay Later Messaging
Step 1: Choose message placement
Click the button below and then hover over your page to select a placement.